
Install and Configure Intento Language Hub for Genesys Cloud
This article is for Genesys Cloud administrators. It covers everything needed before support agents can translate chats and emails with Intento Language Hub for Genesys Cloud. The app is listed on Genesys AppFoundry, and a setup wizard creates every Genesys Cloud object the app needs.
Before You Install
Make sure you have the following:
An active Intento subscription. To get one, contact our sales team or your Customer Success Manager.
An Intento API key, from your Intento account manager or the Intento Console. The wizard stores it in the app configuration, so support agents never enter it. For deployments across several regions or teams, use a separate key for each, so usage and quotas stay separate.
A Genesys Cloud account with admin permissions. The wizard checks your permissions before it creates anything and stops if one is missing. The built-in admin role covers all of them:
Area Permissions Integrations integrations:integration:view,integrations:integration:add,integrations:integration:editRoles authorization:role:view,authorization:role:add,authorization:grant:addGroups directory:group:addOAuth clients oauth:client:view,oauth:client:add,oauth:client:editThe language pairs you need at launch, including any regional locale mappings such as
FR → FR-CA. Intento sets them up with you.A decision on content safety: on for chat, for email, for both, or off at go-live, and which Genesys Cloud role names may change these settings inside the app.
For email translation, an email queue with an inbound email flow in Genesys Cloud. The app works with your existing email routing and needs nothing else for email.
Install the App from AppFoundry
Sign in to Genesys Cloud with the admin account you use for the installation.
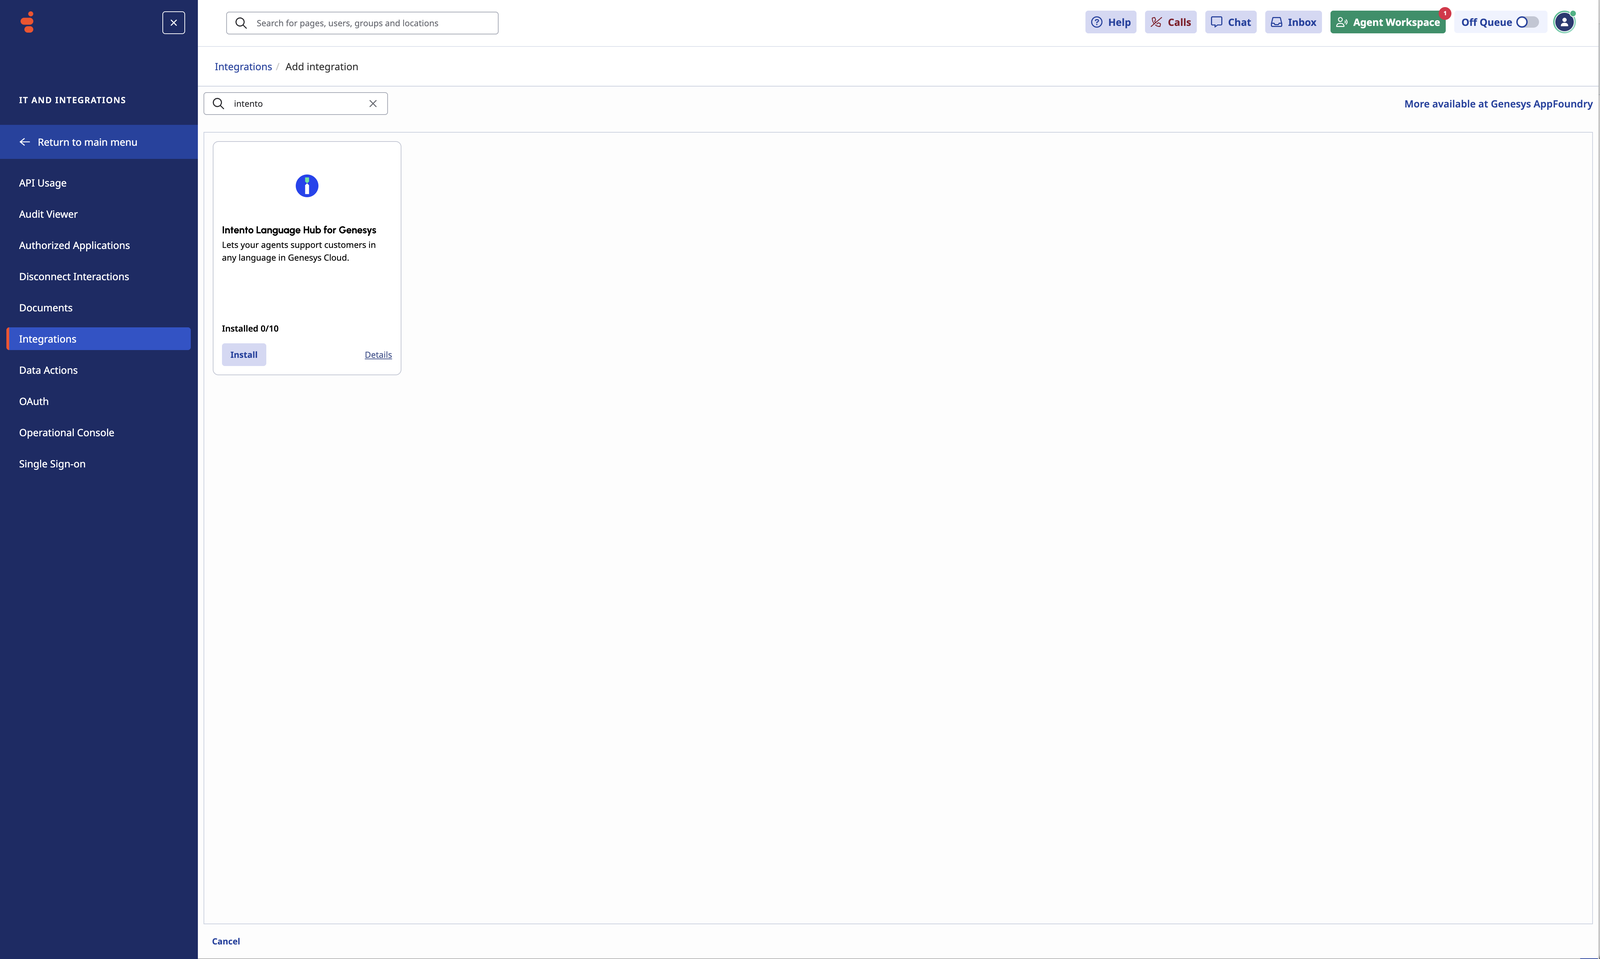
Go to Admin → Integrations → Integrations, click + Integrations, search for intento, and click Install on the Intento Language Hub for Genesys card.
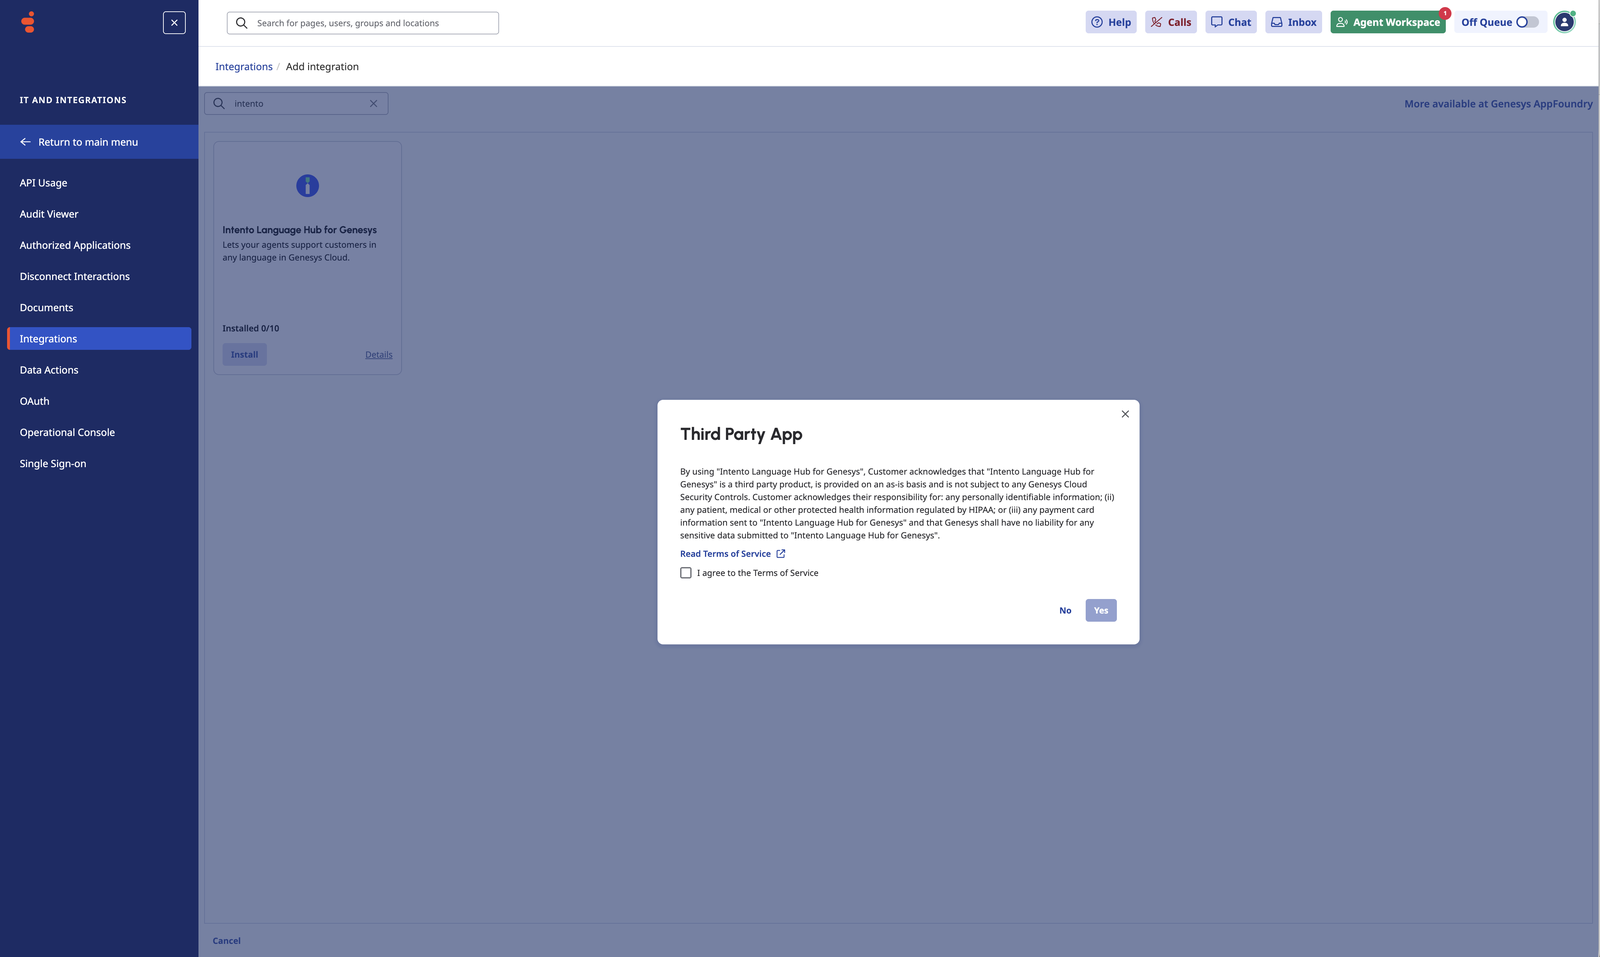
In the Third Party App dialog, tick I agree to the Terms of Service and click Yes.
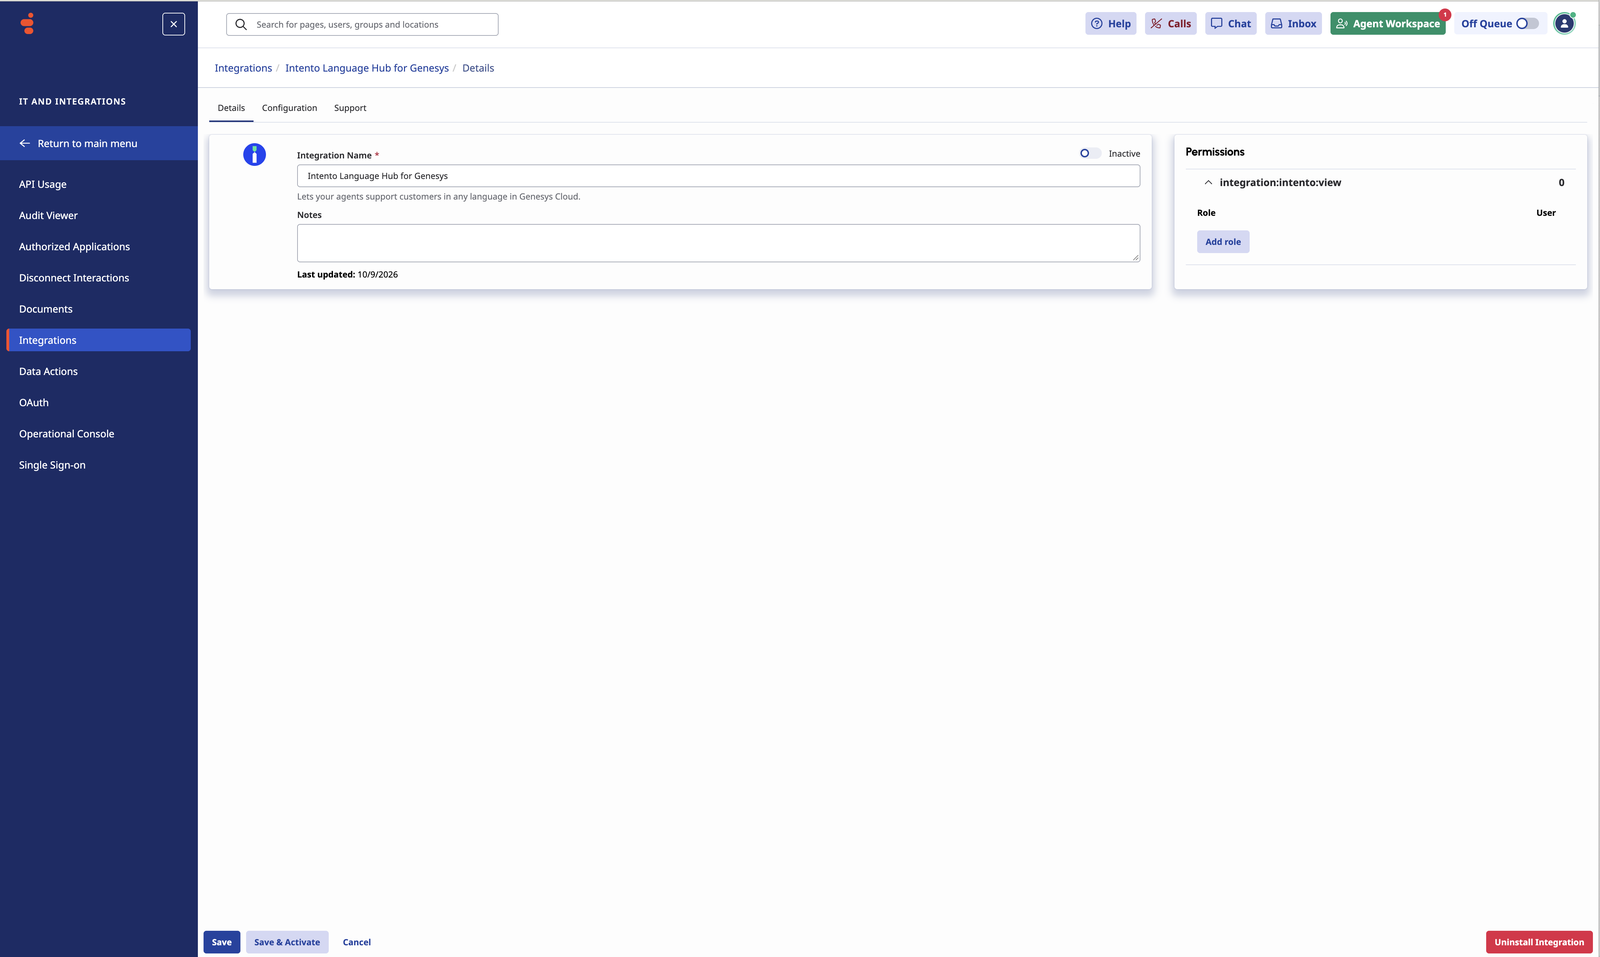
The integration opens on its Details tab with the status Inactive. Click Save & Activate.
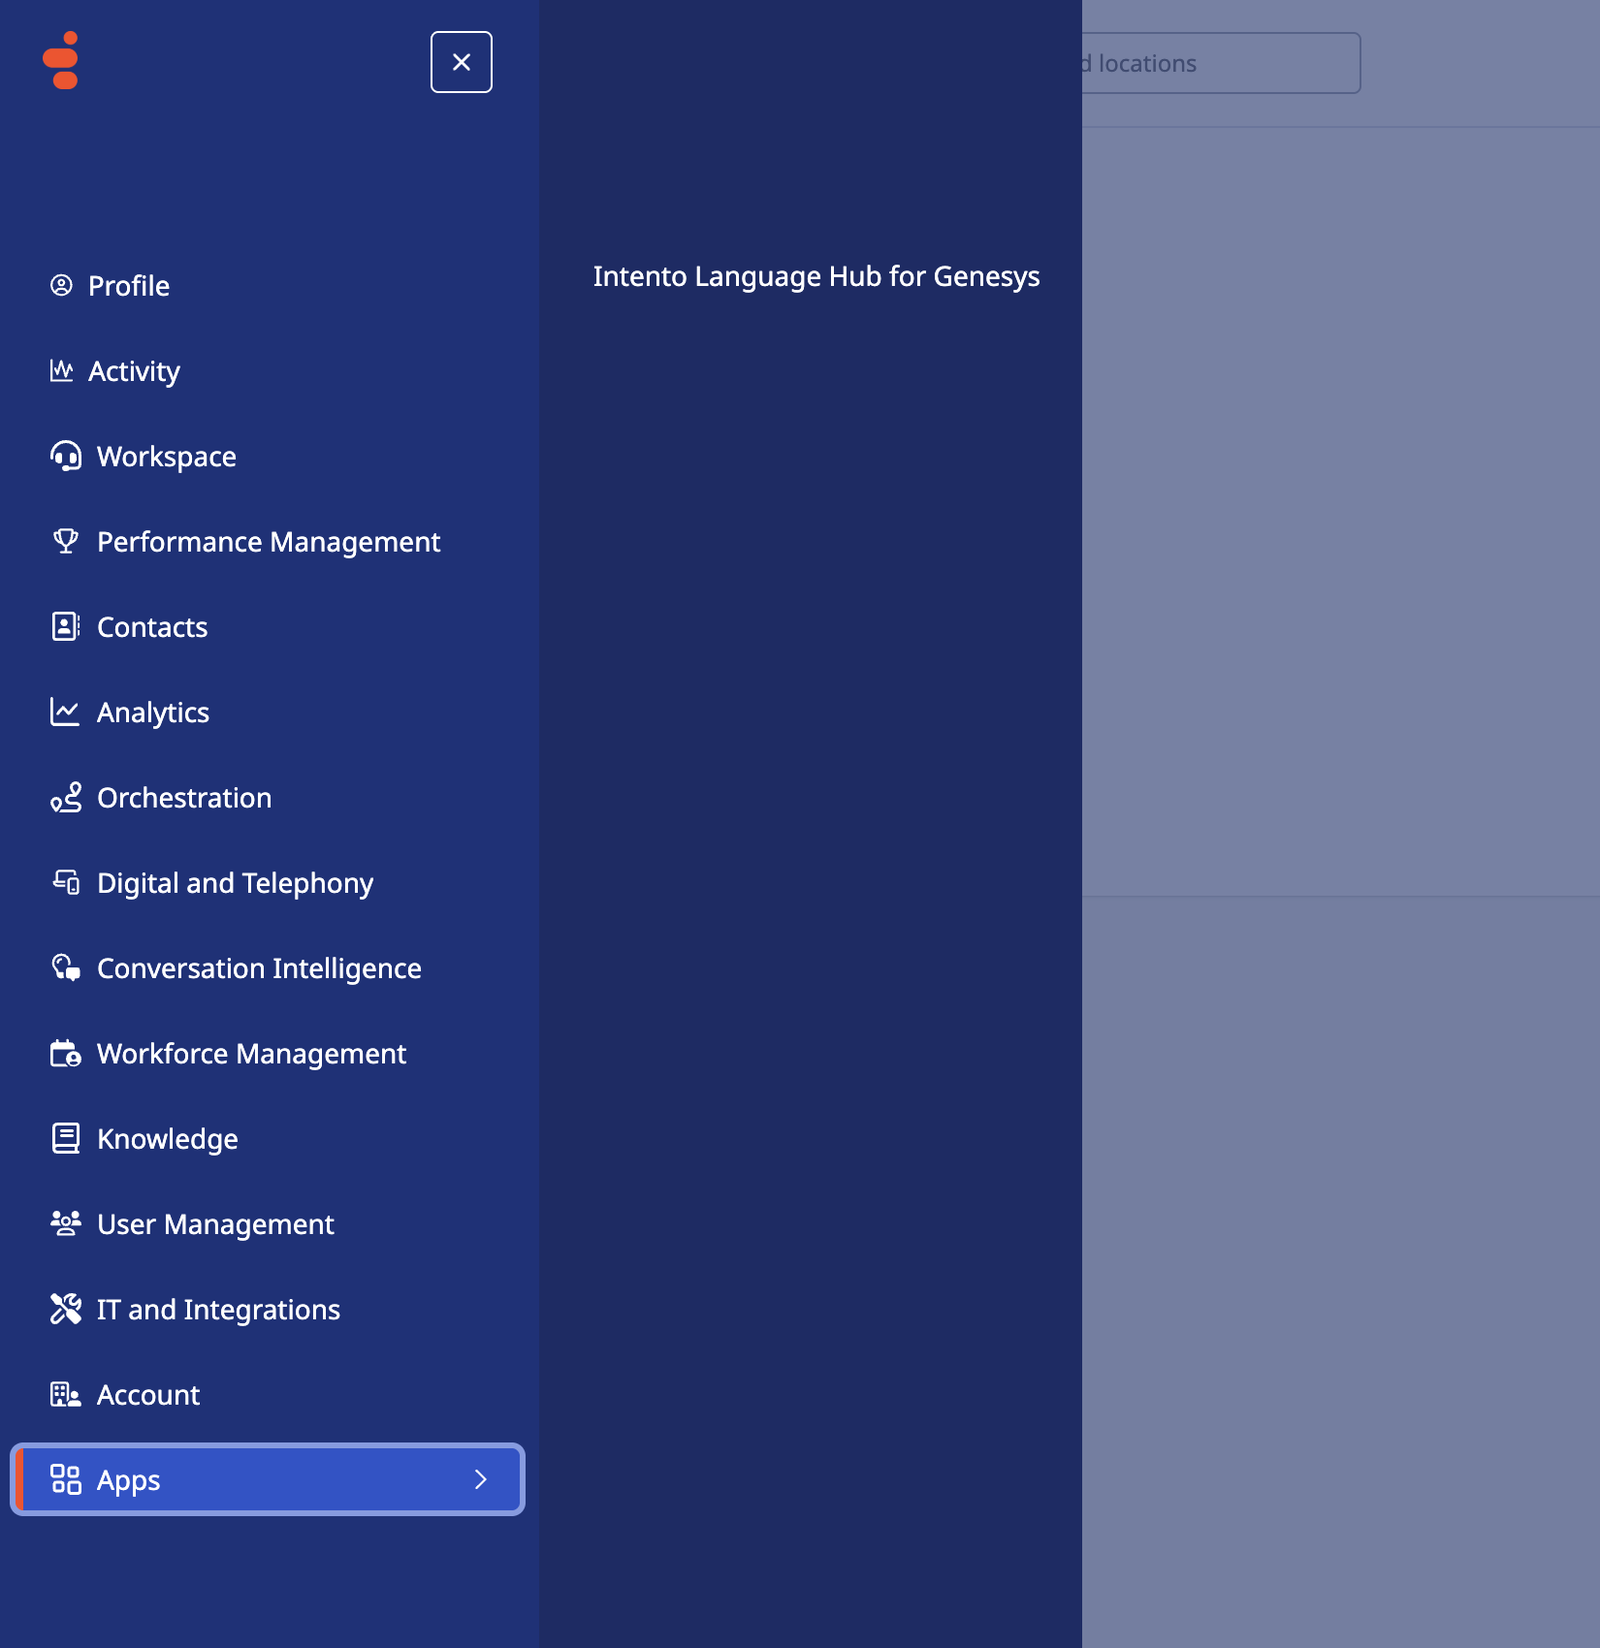
Open Menu → Apps → Intento Language Hub for Genesys. The setup wizard opens inside Genesys Cloud, signed in with your account, with your region and organization already set. If Genesys Cloud asks you to sign in again, do so, and the wizard continues on its own.
Run the Setup Wizard
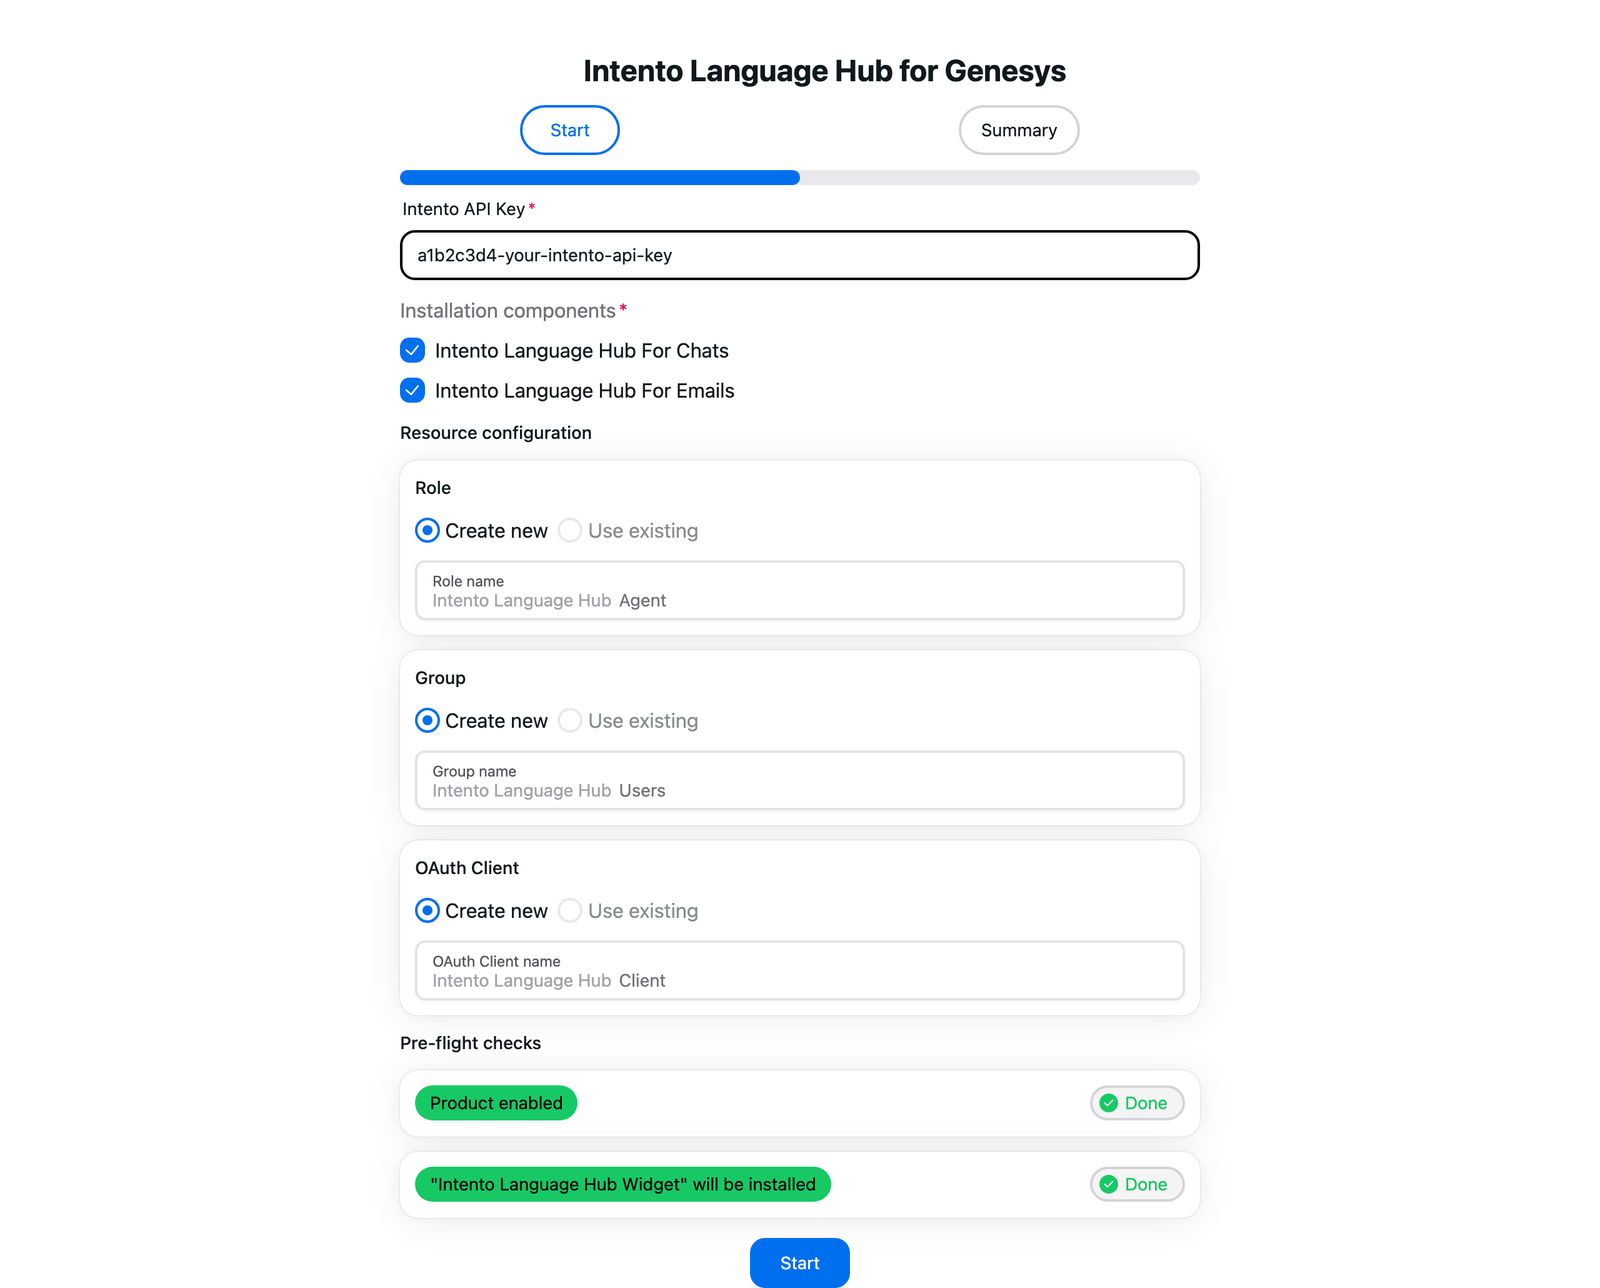
The wizard has two screens. Start collects your API key and checks your organization before anything is created. Summary creates the objects one by one, with a log for each step. The Start button stays disabled until every check passes.
Intento API Key. Paste the key you received from Intento.
Installation components. Leave both For Chats and For Emails selected unless Intento told you otherwise. At least one is required.
Resource configuration. For a first installation, keep Create new for the Role, the Group, and the OAuth Client. The default names are Intento Language Hub Agent, Intento Language Hub Users, and Intento Language Hub Client. You can rename them, and the wizard always adds the Intento Language Hub prefix. If an object with that name already exists, the wizard warns you and offers Use existing or Create anyway.
Pre-flight checks run on their own. Wait for both chips to turn green. The second one, "Intento Language Hub Widget" will be installed, confirms that no earlier installation exists.
Click Start.
A red Insufficient permissions banner at the top names the permissions your account lacks. Ask your Genesys Cloud administrator to grant them, then reload the wizard.
On the Summary screen, four steps run one after another, and each card shows a green Done chip when it finishes:
The Role is created, and your user is added to it.
The Group is created, and your user is added to it.
The Interaction widget, the Intento Language Hub app, is created with your API key, linked to the group, and enabled.
The OAuth client is created with the scopes the app needs.
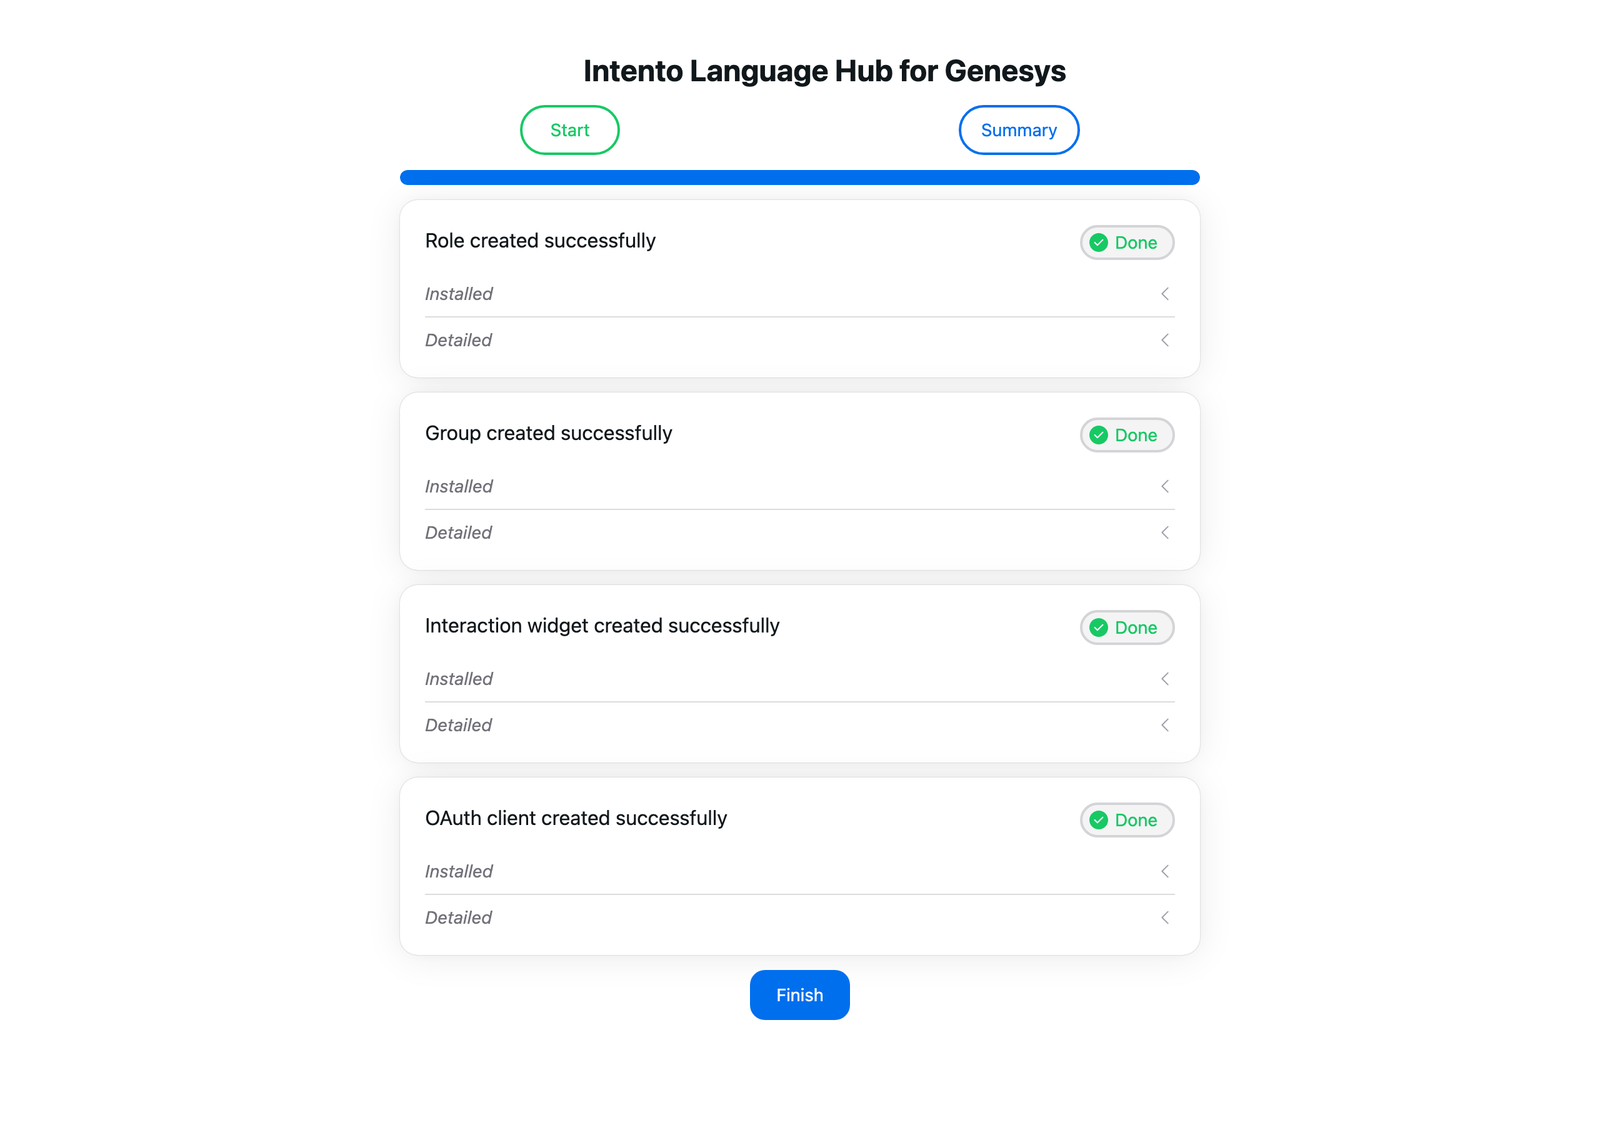
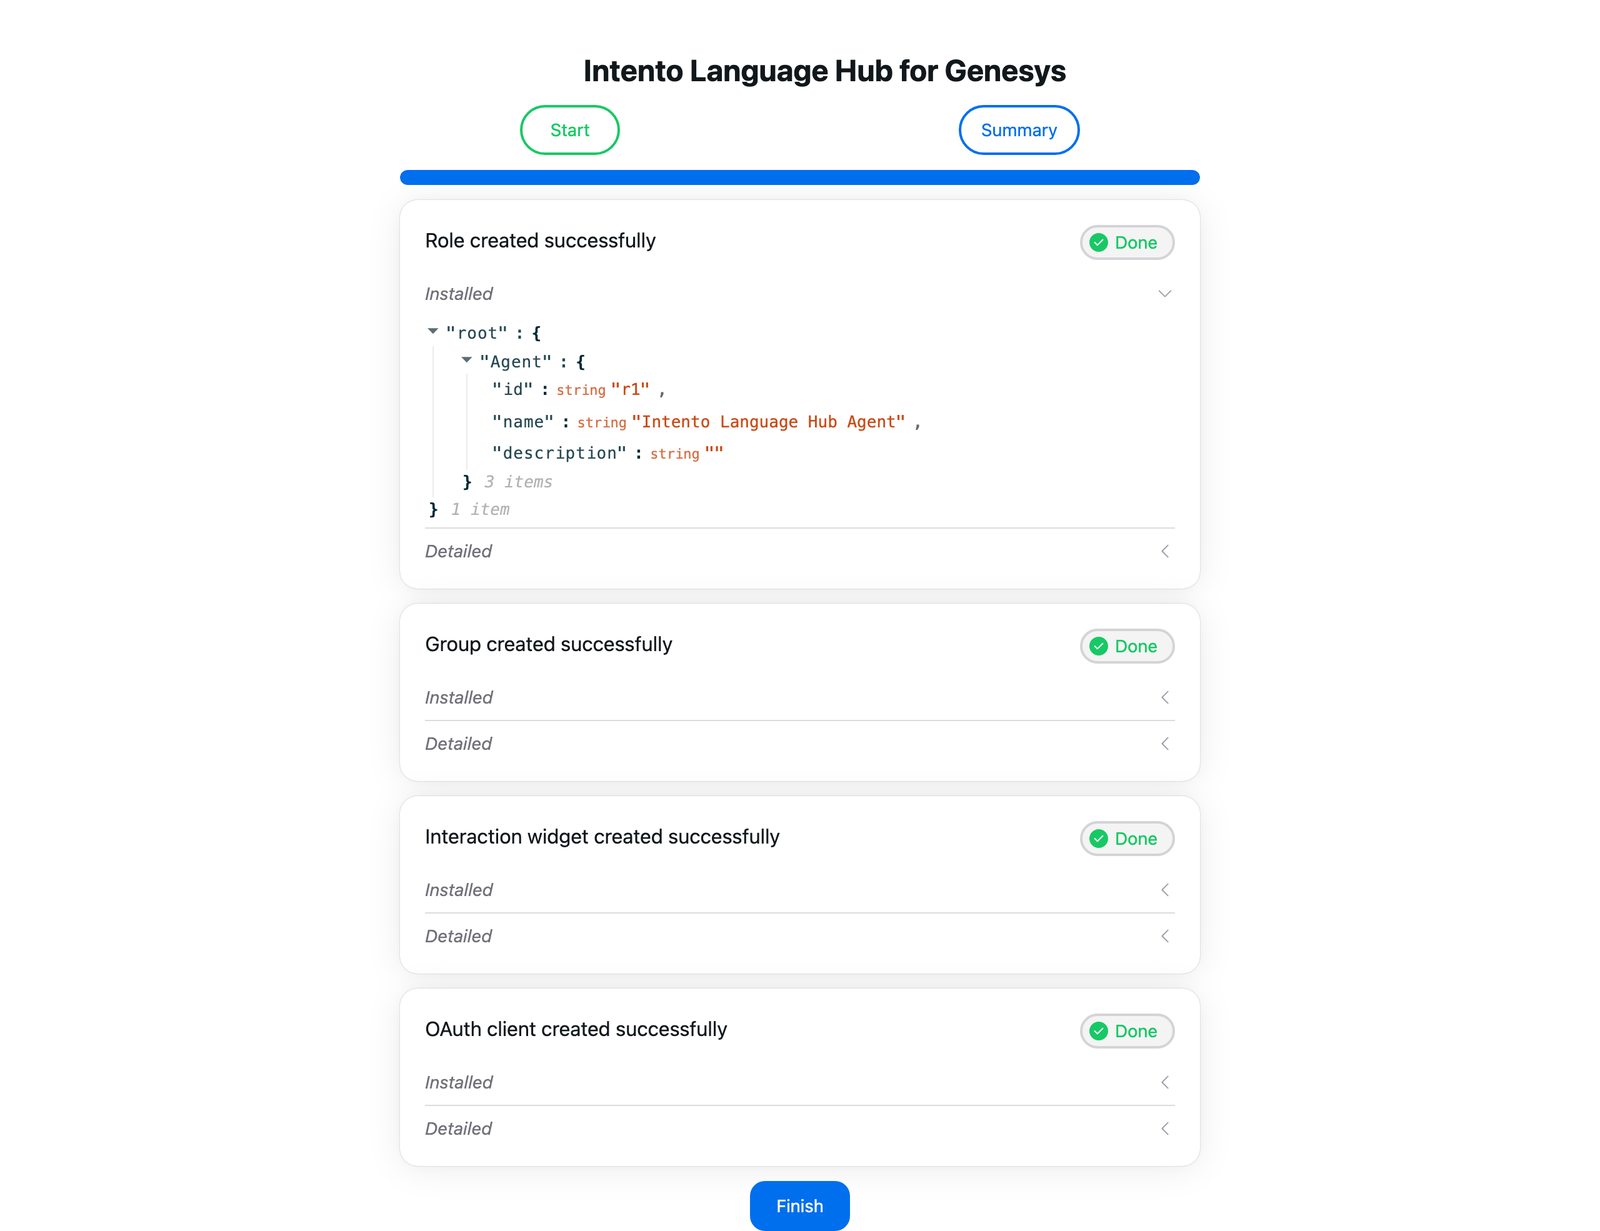
Expand Installed under a card to see the Genesys Cloud object it created, with its ID, and Detailed to see the log for that step. When all four cards show Done, click Finish. Support agents in the Intento Language Hub Users group see the app on their next conversation.
If a step fails, the remaining steps are marked Skipped and a Provisioning failed card appears. Click Rollback to remove the objects created in this run, or Abort to keep them. Fix the cause, usually a permission, and click Restart.
What the Wizard Creates
Every object carries the Intento Language Hub prefix, so you can find it in Genesys Cloud Admin.
| Object | Default name | Where to find it in Admin | Purpose |
|---|---|---|---|
| Role | Intento Language Hub Agent | People & Permissions → Roles / Permissions | Marks the support agents who use the app. The group controls who sees it. |
| Group | Intento Language Hub Users | Directory → Groups | Controls which support agents see the app |
| Interaction widget | Intento Language Hub Widget | Integrations → Integrations | The translation panel next to chat, web messaging, open messaging, and callback conversations |
| OAuth client | Intento Language Hub Client | Integrations → OAuth | Lets the app call Genesys Cloud APIs on behalf of the support agent (authorization code grant, 24-hour tokens) |
To give more support agents access, add them to the Intento Language Hub Users group and assign them the Intento Language Hub Agent role. The wizard doesn't need to run again.
To remove what the wizard created, open it in uninstall mode: https://connector-genesys-wizard.inten.to/start?environment=REGION&uninstall=true, with your Genesys Cloud region in place of REGION, for example usw2.pure.cloud. Sign in when asked, and pick the role, group, OAuth client, and widget to remove. The AppFoundry integration itself is removed in Admin → Integrations → Intento Language Hub for Genesys → Uninstall Integration.
Set Up Languages and Content Safety with Intento
Intento Support activates your Product Configuration from the settings you provide. Send your Intento contact:
The language pairs to enable, including locale mappings such as
FR → FR-CA.Your decisions on content safety scope and the Genesys Cloud role names allowed to change content-safety settings (see Check Replies for Offensive Content in Genesys Cloud).
Intento confirms when the integration is ready to use.
Validate the Installation
Run a short end-to-end test with the checks at the end of Translate Chats with Intento Language Hub for Genesys Cloud, Translate Emails with Intento Language Hub for Genesys Cloud, and Check Replies for Offensive Content in Genesys Cloud.
Recommendations
Use a separate Intento API key for each region or team, so usage, quotas, and incidents stay separate.
Test regional locale variants such as
FR-CAandEN-GB. A wrong locale tag is a frequent cause of "the translation is wrong" reports.